Add schematics to Angular library

And publish it and use it.
This article is an attempt to simplify an existing documentation page from Angular, about how we can add schematics to a library.
We will go through the whole process up until publishing, so there will be very little code about code scaffolding itself. If you’re looking for details about possible code actions offered by Angular schematics, check some articles at the bottom of this page.
The most important part of this is about packaging the schematics properly along with the library, so you simply have to be carefull with the relative paths you are working with.
Create workspace
We start with an empty workspace, it will contain a sandbox app and a library.
ng new ng-library-schematics --create-application false --skip-install trueCreate the library
We create a simple Angular library and add a script to build it :
ng g library @aboudard/ng-libIn root package.json :
"scripts": {
   "build:lib": "ng build @aboudard/ng-lib",
We need to build the library before we use any of its components, since root tsconfig.json is refering to /dist folder :
"paths": {
   "@aboudard/ng-lib": [
      "dist/aboudard/ng-lib/aboudard-ng-lib",
      "dist/aboudard/ng-lib"
   ]
Create the application
Let’s consume the library in an application in order to check if everything is fine.
ng g application sandbox --routing --style scssIn our app, we can simply import the library exported Module and add the component in our app :

<h1>{{title}}</h1>
<lib-ng-lib></lib-ng-lib>
The library component is displayed in our app, so everything works fine. We can start adding the schematics.
Create the library schematics
We fill follow the process described in this Angular doc page.
- Install the proper version of the tools :
@angular-devkit/schematics- Add a /schematics folder in your library
- Create collection.json in this folder (this is the most important file of this process)
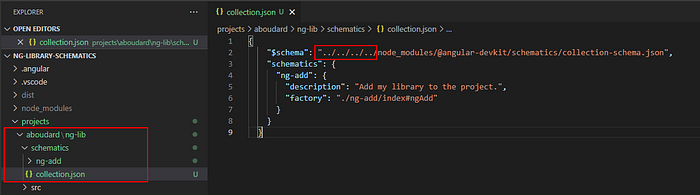
Beware of the relative path where your library is located, this must be reflected in the collection.json $schema variable.
- Create a /ng-add folder
- Create an index.ts file within this folder, use the name declared in previous factory variable, here it’s ngAdd (very simple, since we won’t make relevant work here) :
export function ngAdd(): Rule {
   return (tree: Tree, context: SchematicContext) => {
      context.logger.log('info', `✅️ Running Schematics`);
      context.addTask(new NodePackageInstallTask());
      return tree;
   };
}
Note that the NodePackageInstallTask is pretty useless here, because we don’t install nothing except the library itself, and ng-add command is already installing like the npm i would do.
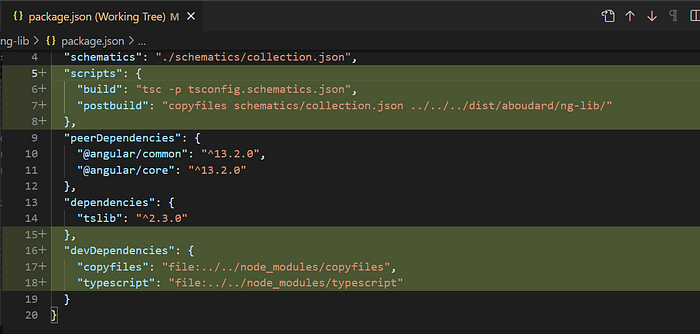
- Reference the collection.json in the package.json of your library : this is very important because during the execution of the schematics, it will be needed. And note that for now, the file is not where we declare it :

Configure the build of the schematics
The point is to build it in the same folder as the library. It means we want the .js files in the library /dist folder, but also the collection.json, just like we mentioned.
- Create the tsconfig.schematics.json file in the library root folder, this is the instruction to the typescript compiler, and most important is outDir :
{
"compilerOptions": {
"baseUrl": ".",
"lib": ["es2018","dom"],
"declaration": true,
"module": "commonjs",
"moduleResolution": "node",
"noEmitOnError": true,
"noFallthroughCasesInSwitch": true,
"noImplicitAny": true,
"noImplicitThis": true,
"noUnusedParameters": true,
"noUnusedLocals": true,
"rootDir": "schematics",
"outDir": "../../../dist/aboudard/ng-lib/schematics",
"skipDefaultLibCheck": true,
"skipLibCheck": true,
"sourceMap": true,
"strictNullChecks": true,
"target": "es6",
"types": ["jasmine","node"]
},
"include": ["schematics/**/*"],
"exclude": ["schematics/*/files/**/*"]
}
You should test the build with a script in your library to see if your paths are correct (and later call it from your main workspace package.json) :
- Install in your main project copyfiles via npm.
- Use it to copy relevant files to /dist folder especially collection.json, only after the build, with a “post” script.
So we run the build script and see if the files end up in the right folder.

Note: you could skip this copyfiles part by simply exporting the schematics folder files with the
assetsconfiguration of your library as follows :
In your ng-package.json file, add the reference to the new schematics folder :
"assets": [
  "./styles/*.*",
  "./assets/**/*.*",
  "./schematics/**/*.*"
 ]
In this case, you will copy all files present in the folder at build time, unless you target more specific files than **/*.*
Also note that if you do that, you could change the outDir of your tsconfig file, and leave the compiled .js files in the
./schematicsfolder, since they will be copied in the dist folder during the library build :
"outDir": "./schematics",Ok, the files are where they are supposed to be. The last part of the package.json tells what kind of install you want for your library through the ng add command. If you expose components, it probably should end up in dependencies, but if it’s just scripting, it would be devDependencies, and maybe you don’t even want to reference it at all but only use it one time.

Test your library locally
A good way to test a library, with schematics or not, is a sandbox application. With the help of npm link command, we can pretend the library is installed and call the ng-add from it.
Here are the scripts that will help us :
"link:lib": "cd dist/aboudard/ng-lib && npm link",
"link:app": "cd projects/sandbox && npm link @aboudard/ng-lib",
"link:all": "npm run link:lib && npm run link:app",
"link:rm": "npm rm -g @aboudard/ng-lib",
"sandbox:ng-add": "cd projects/sandbox && ng g @aboudard/ng-lib:ng-add",
Publish your library and test schematics
Now it is time to see if it all works in real situation, meaning when we try to add the library to a blank project.
The build process should be :
- Bump the library version if needed (better if you plan to publish)
- Build the library
- Build the schematics
- Pack the library dist folder
- Login with your registry (npm login)
- Publish your library
"build:lib": "ng build @aboudard/ng-lib",
"build:schematics": "tsc -p projects/aboudard/ng-lib/tsconfig.schematics.json",
"postbuild:schematics": "copyfiles projects/aboudard/ng-lib/schematics/collection.json dist/aboudard/ng-lib/schematics/ -f",
"build:all": "npm run build:lib && npm run build:schematics",
"pack:lib": "cd dist/aboudard/ng-lib && npm pack",
"lib:all": "npm run build:all && npm run pack:lib",
"publish:all": "npm run lib:all && npm publish dist/aboudard/ng-lib",
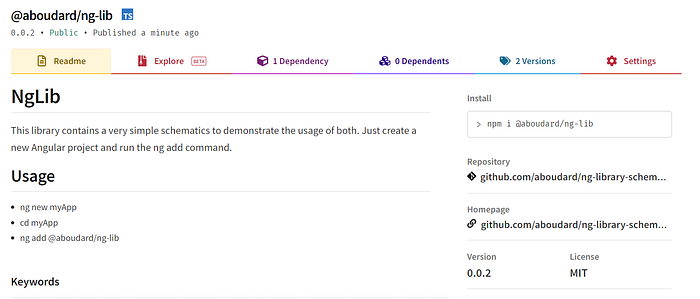
The end result is published indeed here on npmjs.com.
Test the library, install schematics
And now let’s just test this with a new project.
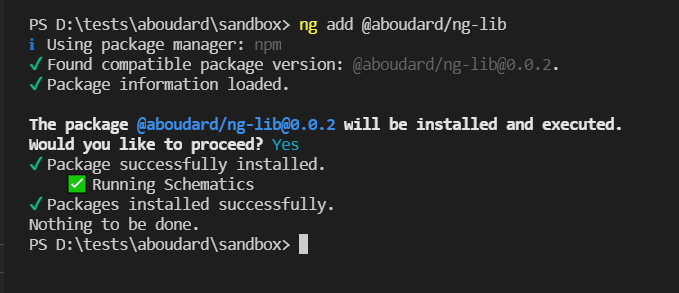
All seems to be fine, note :
- The logger is ok, this is what we wrote in the ngAdd function
- The package was installed twice, because of the task we mentioned earlier
Here is the repo, but you figured it already from the npmjs page ;)
https://github.com/aboudard/ng-library-schematics
References
I walked through these articles to gather some of informations :